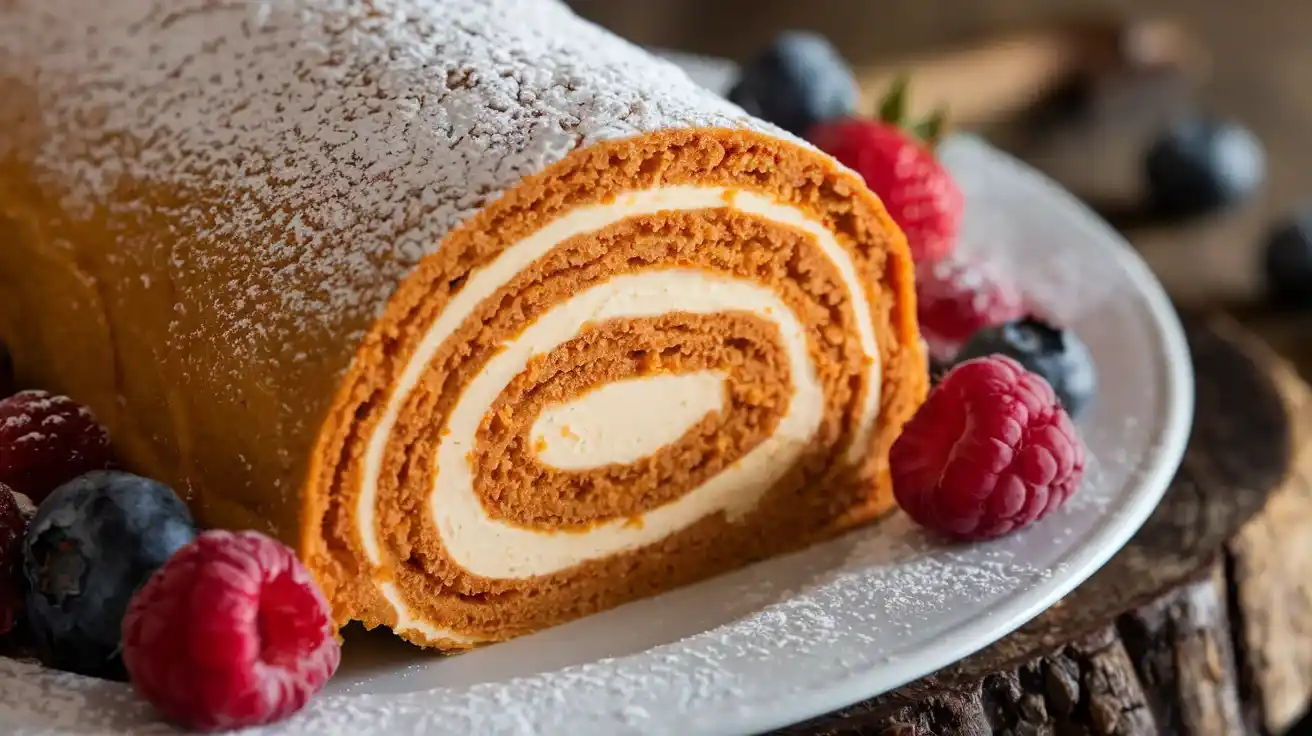
Pumpkin Roll with Cream Cheese Filling is the ultimate fall dessert, combining warm spices, a soft pumpkin sponge, and a luscious cream cheese center into one show-stopping treat. There’s something magical about rolling up the flavors of autumn, and this recipe makes it perfectly achievable.
As someone who’s baked countless Pumpkin Roll with Cream Cheese Filling, I can confidently say this dessert is a crowd-pleaser. It’s not just the flavor that stands out—it’s the way every bite brings back memories of cozy fall gatherings with loved ones.
The challenge? Perfecting that roll without cracks or stickiness. Trust me, I’ve been there—struggling with crumbly sponges and messy fillings. After lots of trial and error, I’ve discovered the secrets to success, and I’m here to guide you every step of the way.
Whether you’re a beginner or a seasoned baker, this guide to creating the perfect Pumpkin Roll with Cream Cheese Filling will walk you through each step—from preparing the batter to troubleshooting and serving tips. Let’s get rolling and bring this timeless fall dessert to life!
“Discover more fall dessert ideas like our Pumpkin Cake Recipe for your seasonal gatherings.”
Key Ingredients for Pumpkin Roll with Cream Cheese Filling
Creating the perfect Libby’s Pumpkin Roll with Cream Cheese Filling starts with gathering the right ingredients and tools. Having everything prepared before you start ensures a smoother baking process and helps you avoid surprises along the way. Let’s take a closer look at what you’ll need for this delicious dessert.
Essential Ingredients for the Sponge
- Libby’s 100% Pure Pumpkin
- The star of this recipe! Libby’s canned pumpkin provides the perfect texture and flavor. It’s rich, creamy, and packed with natural pumpkin goodness.
- All-Purpose Flour
- This gives the sponge its structure. Make sure to measure it correctly to avoid a dense or gummy texture.
- Granulated Sugar
- Adds sweetness and balance to the warm spices.
- Eggs
- Eggs act as a binding agent and give the sponge its light, fluffy texture.
- Baking Powder and Baking Soda
- These leavening agents ensure the sponge rises perfectly without collapsing.
- Spices: Ground Cinnamon, Nutmeg, and Ginger
- These warm spices are key to giving the Pumpkin Roll with Cream Cheese Filling its classic fall flavor.
- Cream Cheese
- For the irresistible filling. Use full-fat cream cheese for the best results.
- Powdered Sugar
- Adds sweetness to the filling and is used for dusting the roll.
- Vanilla Extract
- Enhances the flavor of both the sponge and the filling.
- Butter
- Softened butter helps make the filling creamy and smooth.
Recommended Tools for Baking and Rolling Success
- Jelly Roll Pan
- A must-have for baking the sponge evenly. Look for a 10×15-inch pan, as this is the perfect size for rolling.
- Parchment Paper
- Prevents sticking and makes rolling the sponge much easier.
- Thin Kitchen Towel
- This is essential for rolling the sponge while it cools. Dust it with powdered sugar to prevent sticking.
- Mixing Bowls
- You’ll need separate bowls for the batter and filling.
- Whisk and Electric Mixer
- A whisk helps with the dry ingredients, while an electric mixer is perfect for blending the filling to a creamy consistency.
- Spatula
- Ideal for spreading the batter evenly and for handling the filling.
- Cooling Rack
- Helps cool the sponge quickly and evenly before rolling.
- Offset Spatula or Butter Knife
- Perfect for spreading the cream cheese filling without tearing the sponge.
How to Prepare the Batter for Pumpkin Roll with Cream Cheese Filling
The batter is the foundation of your Libby’s Pumpkin Roll with Cream Cheese Filling, so getting it right is key to a flawless dessert. A light, fluffy sponge that rolls easily starts with properly mixed ingredients and a little attention to detail. Here’s how to prepare the perfect batter every time.
Mixing the Dry Ingredients
- Start with the Dry Ingredients
- In a medium bowl, sift together:
- ¾ cup all-purpose flour
- 1 teaspoon baking powder
- ½ teaspoon baking soda
- ½ teaspoon ground cinnamon
- ¼ teaspoon ground nutmeg
- ¼ teaspoon ground ginger
- Sifting ensures even distribution of the leavening agents and spices while eliminating clumps.
- Combine Wet Ingredients
- In a large mixing bowl, beat together:
- 3 large eggs
- 1 cup granulated sugar
- Beat on medium-high speed using an electric mixer until the mixture is pale, thick, and fluffy (about 3-4 minutes). This step is critical for incorporating air, which helps the sponge rise.
- Add the Star Ingredient: Libby’s 100% Pure Pumpkin
- Gently mix in ⅔ cup of Libby’s canned pumpkin.
- Make sure the pumpkin is fully incorporated for a consistent flavor and texture.
- Combine Wet and Dry Ingredients
- Gradually fold the dry ingredients into the wet mixture using a spatula.
- Be gentle to avoid deflating the batter. Fold until no streaks of flour remain, but don’t overmix—this can make the sponge dense.
Adding the Pumpkin for a Perfect Sponge

- Why It’s Perfect for Pumpkin Rolls
Libby’s 100% pure pumpkin has a smooth, rich consistency and robust flavor, making it the best choice for this recipe. Unlike pumpkin pie filling, which contains added sugar and spices, pure pumpkin allows you to control the flavor balance in your roll. - Pro Tip: Ensure the canned pumpkin is at room temperature before adding it to the batter. Cold pumpkin can cause the batter to seize or mix unevenly.
Folding the Batter for a Light and Fluffy Texture
- Don’t Skip Sifting
- Sifting aerates the dry ingredients, ensuring a light, fluffy texture.
- Temperature Matters
- Use room-temperature eggs and canned pumpkin to help the batter mix smoothly and evenly.
- Use the Right Tools
- A rubber spatula is perfect for folding the batter gently without overmixing.
Baking the Sponge for Pumpkin Roll with Cream Cheese Filling
Baking the sponge for Libby’s Pumpkin Roll with Cream Cheese Filling is a crucial step, as it determines the texture and flexibility needed for rolling. When done right, the sponge will be soft, tender, and easy to work with—minimizing cracks during the rolling process. Here’s how to nail it.
Key Baking Tips to Avoid Cracks
- Prepare the Jelly Roll Pan
- Line a 10×15-inch jelly roll pan with parchment paper, leaving an overhang on the edges for easy removal.
- Lightly grease the parchment paper with cooking spray or butter to prevent sticking.
- Spread the Batter Evenly
- Pour the prepared batter onto the pan.
- Use an offset spatula to spread the batter into an even layer, ensuring it reaches all corners.
- The even thickness ensures uniform baking and prevents uneven textures that could lead to cracks.
- Bake at the Right Temperature
- Preheat your oven to 375°F (190°C).
- Bake the sponge for 12-15 minutes, or until the top springs back when lightly touched. Avoid overbaking, as this can make the sponge too dry and prone to cracking.
How to Check for Doneness: Perfect Timing Matters
- Visual Cues
- The sponge should have a light golden-brown color and appear set across the surface.
- Touch Test
- Gently press the center of the sponge with your fingertip. If it springs back, it’s done.
- Edge Separation
- The edges of the sponge should slightly pull away from the sides of the pan.
- Toothpick Test (Optional)
- Insert a toothpick into the center of the sponge. If it comes out clean, it’s ready to remove from the oven.
Pro Tip: The Importance of Timing
- Cool Quickly to Retain Moisture
As soon as the sponge is out of the oven, it’s essential to move quickly to the next steps. Allowing it to sit too long in the pan can make it harder to roll.
Cooling and Prepping for Rolling
- Dust with Powdered Sugar
- Lay a thin, clean kitchen towel on your work surface and generously dust it with powdered sugar. This prevents the sponge from sticking and helps create a smooth roll.
- Transfer the Sponge
- Carefully flip the hot sponge onto the towel. Peel off the parchment paper gently to avoid tearing the sponge.
- Roll While Warm
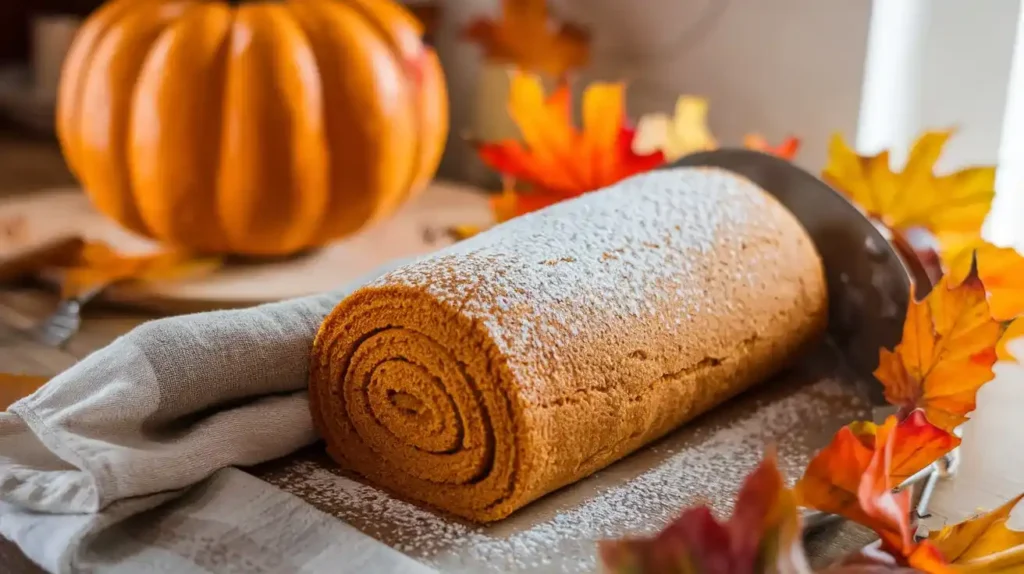
- Starting at one of the short ends, roll the sponge and towel together into a tight spiral. Rolling while the sponge is warm helps set the shape and prevents cracks later.
- Let the rolled sponge cool completely on a wire rack before unrolling and filling.
Rolling the Pumpkin Roll with Cream Cheese Filling
The Pumpkin Roll with Cream Cheese Filling is what takes Libby’s Pumpkin Roll with Cream Cheese Filling from delicious to irresistible. This smooth, sweet, and tangy filling perfectly complements the warm spices of the sponge, creating a dessert that’s as indulgent as it is beautiful. Here’s how to craft the perfect Pumpkin Roll with Cream Cheese Filling.
Ingredients for a Smooth, Delicious Filling
- Full-Fat Cream Cheese (8 ounces)
- Use softened cream cheese for the smoothest texture. Full-fat is recommended for a rich and creamy consistency.
- Unsalted Butter (4 tablespoons)
- Also softened, the butter helps to make the filling extra creamy and easy to spread.
- Powdered Sugar (1 cup)
- Adds just the right amount of sweetness while maintaining a smooth texture. Sift the powdered sugar beforehand to avoid lumps.
- Vanilla Extract (1 teaspoon)
- Enhances the flavor and adds a subtle sweetness.
Blending Techniques for Creamy Perfection
- Prepare Your Ingredients
- Make sure both the cream cheese and butter are softened to room temperature. Cold ingredients can lead to a lumpy filling.
- Mix the Cream Cheese and Butter
- In a large mixing bowl, beat the cream cheese and butter together using an electric mixer on medium speed.
- Beat until the mixture is smooth, fluffy, and well-combined (about 2-3 minutes).
- Add the Powdered Sugar Gradually
- Reduce the mixer speed to low and gradually add the sifted powdered sugar.
- Increase the speed to medium once the sugar is incorporated, and beat until smooth and creamy.
- Stir in the Vanilla Extract
- Add the vanilla and mix for another 30 seconds to blend.
Pro Tips for the Best Cream Cheese Filling
- Avoid Overmixing
- While it’s important to mix thoroughly, overmixing can cause the filling to become too loose. Stop mixing as soon as the ingredients are fully combined.
- Consistency Check
- The filling should be thick yet spreadable. If it’s too runny, chill it in the refrigerator for 10-15 minutes before spreading.
- Taste Test
- Always taste your filling before using it to ensure it’s perfectly balanced in sweetness and flavor. Adjust with a pinch of salt or more vanilla if needed.
Filling Variations for Extra Flavor
- Cinnamon Cream Cheese Filling
- Add ½ teaspoon ground cinnamon for a subtle spicy twist.
- Maple Cream Cheese Filling
- Substitute 1 teaspoon of vanilla extract with 1 teaspoon of maple syrup for a cozy fall flavor.
- Nutty Add-Ins
- Fold in finely chopped pecans or walnuts for a bit of crunch in the filling.
Rolling the Pumpkin Roll: Secrets for Success
Rolling the Pumpkin Roll with Cream Cheese Filling is where all your preparation truly pays off. This step ensures your dessert not only looks stunning but also maintains its soft, crack-free texture. Rolling may seem intimidating, but with the right technique, it’s a breeze. Let’s break it down step by step.
How to Roll the Pumpkin Sponge Without Cracking
- Roll While the Sponge is Warm
- As soon as the sponge comes out of the oven, it’s essential to roll it immediately while it’s still warm and pliable. Waiting too long will allow it to cool and become less flexible, which can lead to cracks.
- Use a Powdered Sugar-Dusted Towel
- Lay a thin, clean kitchen towel on a flat surface and generously dust it with powdered sugar. This prevents the sponge from sticking to the towel while rolling.
- Carefully invert the sponge onto the towel, peel off the parchment paper, and sprinkle the top with more powdered sugar.
- Start Rolling Gently
- Begin rolling from one of the short ends of the sponge. Roll it tightly but gently, using the towel to guide you. Avoid applying too much pressure, which could cause tearing.
- Let It Cool Rolled
- Once rolled, leave the sponge wrapped in the towel to cool completely on a wire rack. This helps set the roll shape and prevents cracks when you unroll it for filling.
Cooling and Prepping the Roll for Filling
- Wait for Full Cooling
- Allow the rolled sponge to cool for at least 1-2 hours. Attempting to fill it while warm can cause the cream cheese filling to melt, creating a sticky mess.
- Unroll Carefully
- Once the sponge is fully cooled, unroll it gently. Don’t worry if it doesn’t lie completely flat—this is normal and makes rerolling easier.
- Trim the Edges (Optional)
- If the edges of the sponge are uneven or slightly crispy, trim them with a sharp knife for a neat, uniform appearance.
Pro Tips to Avoid Cracks During Rolling
- Dust Generously with Powdered Sugar
- The powdered sugar acts as a barrier, preventing the sponge from sticking to the towel or itself.
- Don’t Overbake the Sponge
- Overbaking dries out the sponge, making it more likely to crack when rolled. Stick to the recommended baking time and test for doneness as outlined earlier.
- Handle with Care
- Be gentle while unrolling and rerolling the sponge. Avoid pulling or stretching it unnecessarily.
What to Do if Cracks Happen
- Use the Filling as Glue
- If small cracks occur, don’t panic. Spread the cream cheese filling generously over the sponge, allowing it to seep into any cracks and “glue” the roll together.
- Conceal Imperfections
- Once rolled, dust the pumpkin roll with powdered sugar or drizzle it with a decorative glaze to cover any visible cracks.
Assembling Libby’s Pumpkin Roll
Now comes the most exciting part—assembling your Libby’s Pumpkin Roll with Cream Cheese Filling! This step combines the tender sponge and the rich cream cheese filling, transforming them into a visually stunning dessert. Precision and care are key to achieving a smooth, even roll that holds together beautifully. Let’s walk through the process step by step.
Spreading the Filling Evenly
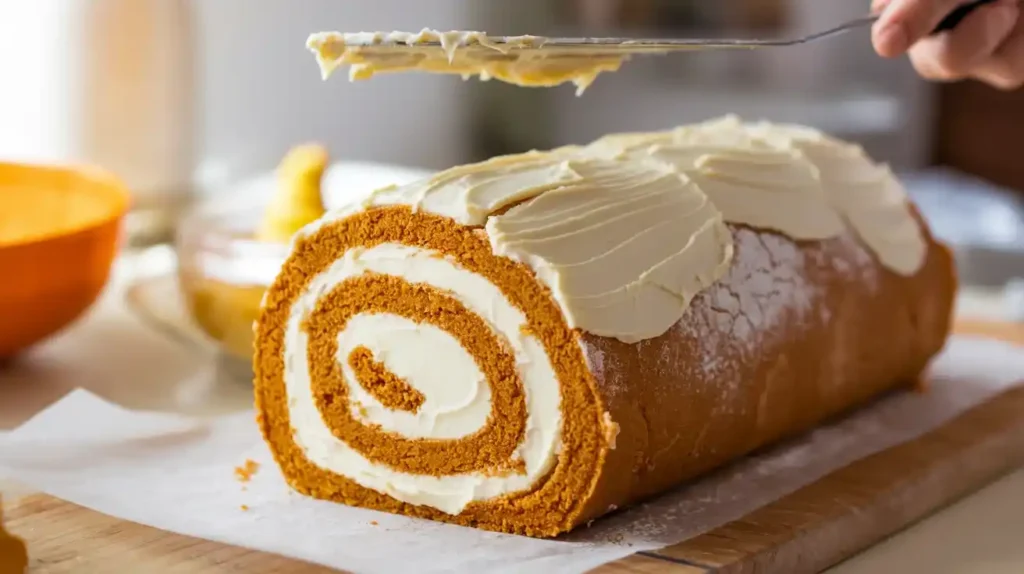
- Prepare the Sponge for Filling
- After the rolled sponge has cooled completely, gently unroll it. It’s okay if it doesn’t lie entirely flat—this is normal and makes rolling easier.
- Spread the Cream Cheese Filling
- Using an offset spatula or the back of a spoon, evenly spread the prepared cream cheese filling over the entire surface of the sponge.
- Leave a small border (about ½ inch) around the edges to prevent the filling from oozing out when you roll it back up.
- Check for Even Coverage
- Ensure the filling is smooth and evenly distributed. This not only enhances the flavor but also helps the roll maintain its structure.
Rolling It Back Up Without Messing It Up
- Start Rolling Gently
- Beginning at the same short end you rolled from initially, start rolling the sponge back up. Use the towel to guide you, but don’t roll the towel into the sponge this time!
- Roll Tightly But Carefully
- Apply gentle pressure as you roll to ensure a tight spiral without squeezing out the filling.
- Seal the Edge
- Once rolled, place the seam side down to keep the roll intact.
Pro Tips for a Flawless Pumpkin Roll
- Chill Before Slicing
- Wrap the Pumpkin Roll with Cream Cheese Filling tightly in plastic wrap and refrigerate for at least 1-2 hours before slicing. This helps the filling set and makes the roll easier to cut.
- Use a Sharp Knife
- When ready to serve, use a serrated knife to slice the roll into even pieces. Wipe the knife clean between cuts for neat, professional-looking slices.
- Decorate Before Serving
- Dust the roll with powdered sugar, or drizzle it with a light glaze for extra flair.
Alternative Ideas for Presentation
- Mini Pumpkin Rolls
- Instead of one large roll, slice the sponge into smaller portions before filling and rolling. This is perfect for individual servings.
- Festive Toppings
- Sprinkle crushed pecans, walnuts, or even orange zest on top for added texture and flavor.
Troubleshooting Common Pumpkin Roll Problems
Even with the best preparation, things don’t always go as planned when baking a Pumpkin Roll with Cream Cheese Filling. From cracks in the sponge to sticky textures, these issues can leave you frustrated. The good news? Most problems are easily fixable with a few adjustments. Let’s explore common challenges and how to solve them so your Libby’s Pumpkin Roll turns out perfectly every time.
Why Does My Pumpkin Roll Crack When I Roll It?
- Problem: The sponge breaks or cracks during the rolling process.
- Cause: This is often due to overbaking, which dries out the sponge and reduces its flexibility. Rolling the sponge when it’s cold can also lead to cracks.
- Solution:
- Prevent Cracks:
- Bake for the exact time recommended (12-15 minutes at 375°F). Test for doneness by pressing the sponge lightly—if it springs back, it’s ready.
- Roll the sponge immediately after removing it from the oven while it’s still warm and pliable.
- Fix Cracks:
- If cracks occur, use the cream cheese filling to “glue” them together. Generously spread filling over the cracked areas, reroll, and dust with powdered sugar to conceal imperfections.
Why Is My Pumpkin Roll Wet or Sticky?
- Problem: The sponge feels sticky or overly moist when unrolled.
- Cause: Excess moisture can be due to underbaking, improper cooling, or insufficient dusting with powdered sugar.
- Solution:
- Prevent Stickiness:
- Bake the sponge fully, ensuring the edges pull away slightly from the pan and the center springs back when touched.
- Dust both the towel and the sponge generously with powdered sugar before rolling.
- Allow the roll to cool completely on a wire rack to prevent condensation buildup.
- Fix Stickiness:
- Place the sticky sponge in the refrigerator for 10-15 minutes before unrolling. This can firm it up and make it easier to handle.
How to Make Pumpkin Roll Not Sticky
- Use Parchment Paper
- Always line your pan with parchment paper to prevent sticking during baking. Grease the paper lightly for extra insurance.
- Cool Completely
- Ensure the rolled sponge cools completely before unrolling to minimize moisture and stickiness.
- Chill Before Serving
- Refrigerate the fully assembled roll for at least 1 hour before slicing to firm up both the sponge and filling.
Why Did My Pumpkin Bread Come Out Gummy?
- Problem: The sponge has a gummy or dense texture instead of being light and fluffy.
- Cause: Overmixing the batter, measuring ingredients incorrectly, or underbaking can lead to a gummy texture.
- Solution:
- Prevent Gumminess:
- Measure flour precisely by spooning it into the measuring cup and leveling it off with a knife.
- Fold the dry ingredients into the wet mixture gently to avoid deflating the batter. Overmixing can lead to excess gluten formation, causing a gummy texture.
- Bake until the sponge is fully set. Check doneness using a toothpick or by pressing the sponge lightly.
Pro Tips for Troubleshooting Success
- Don’t Rush Cooling
- Allow the sponge to cool completely before filling to avoid melting the cream cheese.
- Work in a Humidity-Controlled Environment
- If you live in a humid area, excess moisture in the air can affect your sponge. Consider running a dehumidifier or air conditioner while baking.
- Practice Makes Perfect
- Rolling a pumpkin roll takes practice. Don’t get discouraged if your first attempt isn’t flawless. Small cracks or imperfections don’t affect the taste!
Storage and Serving Tips
Once you’ve mastered rolling and assembling your Libby’s Pumpkin Roll with Cream Cheese Filling, the next step is ensuring it stays fresh and looks stunning when served. Proper storage extends the life of your dessert, while thoughtful presentation enhances its appeal. Let’s dive into how to store and serve your Pumpkin Roll with Cream Cheese Filling for maximum flavor and wow factor.
How to Store Your Pumpkin Roll to Keep It Fresh
- Wrap It Tightly
- After assembling the Pumpkin Roll with Cream Cheese Filling, wrap it tightly in plastic wrap to keep it moist and prevent it from absorbing odors in the fridge.
- For added protection, place the wrapped roll in an airtight container.
- Refrigeration is Key
- Always store your Pumpkin Roll with Cream Cheese Filling in the refrigerator. The cream cheese filling requires refrigeration to stay safe and maintain its creamy texture.
- The roll will stay fresh for up to 3-5 days when properly stored.
- Freeze for Longer Storage
- To freeze, wrap the Pumpkin Roll with Cream Cheese Filling tightly in plastic wrap, followed by a layer of aluminum foil.
- Label it with the date, and store it in the freezer for up to 3 months.
- To serve, thaw the roll in the refrigerator overnight, still wrapped, to retain its moisture.
Serving Suggestions for a Stunning Presentation
- Slice Neatly
- Use a serrated knife to cut the Pumpkin Roll with Cream Cheese Filling into even slices. For the cleanest cuts, wipe the knife with a damp cloth between each slice.
- Dust with Powdered Sugar
- Sprinkle a light layer of powdered sugar over the top of the roll before serving. This adds a touch of elegance and enhances the visual appeal.
- Add Garnishes
- Garnish each slice with a dollop of whipped cream, a sprinkle of cinnamon, or a few crushed pecans for extra flair.
- Plate Beautifully
- Arrange the slices slightly overlapping on a platter for a professional presentation. You can also serve individual slices with a drizzle of caramel or chocolate sauce for added indulgence.
Creative Ideas for Serving Pumpkin Roll
- Make it a Centerpiece Dessert
- Place the Pumpkin Roll with Cream Cheese Filling on a cake stand, decorate with fall leaves or mini pumpkins, and let it shine as the star of your dessert table.
- Pair with Seasonal Drinks
- Serve alongside warm beverages like spiced cider, chai tea, or a pumpkin spice latte for the ultimate fall dessert experience.
- Turn Leftovers into Desserts
- If you have leftover slices, use them as a topping for vanilla ice cream, or crumble them into a parfait with whipped cream and crushed cookies.
Pro Tips for Perfect Storage and Serving
- Chill Before Serving
- Refrigerating the Pumpkin Roll with Cream Cheese Filling for at least 1 hour before serving helps firm up the filling and makes slicing easier.
- Serve at the Right Temperature
- While the Pumpkin Roll with Cream Cheese Filling should be stored cold, it tastes best when served slightly chilled (about 15 minutes out of the fridge).
- Plan Ahead
- If preparing for a party or gathering, the Pumpkin Roll with Cream Cheese Filling can be made a day or two in advance. This allows the flavors to meld together for an even better taste.
FAQs
What Is the Secret to Rolling a Pumpkin Roll?
The key to rolling a pumpkin roll is to do it while the sponge is still warm. A warm sponge is more pliable and less likely to crack. Follow these steps:
Dust a Towel with Powdered Sugar: Lay a clean kitchen towel on a flat surface and generously dust it with powdered sugar to prevent sticking.
Roll Immediately: Flip the warm sponge onto the towel, peel off the parchment paper, and roll the sponge and towel together into a tight spiral.
Cool Rolled: Let the sponge cool completely in its rolled shape to set the structure before filling.
Why Does My Pumpkin Roll with Cream Cheese Filling Crack When I Roll It?
Cracks usually happen if the sponge is overbaked or if it’s rolled after cooling. To prevent cracking:
Bake the sponge just until it’s set. It should spring back when lightly touched and not pull away too far from the edges.
Roll the sponge right out of the oven while it’s warm and flexible.
If cracks do occur, use the cream cheese filling to “glue” the sponge back together and disguise imperfections with powdered sugar.
Is Libby’s 100% Pure Pumpkin Good for Dogs?
Yes, Libby’s 100% Pure Pumpkin can be good for dogs in moderation. It’s rich in fiber and can help with digestive issues like constipation or diarrhea. However:
Avoid Pumpkin Pie Filling: It contains added sugar and spices that are harmful to dogs.
Consult Your Vet: Before adding pumpkin to your dog’s diet, check with your veterinarian for the proper amount.
Why Is My Pumpkin Roll Wet or Sticky?
A wet or sticky Pumpkin Roll with Cream Cheese Filling often results from improper cooling or storage.
Let It Cool Completely: Cool the rolled sponge on a wire rack to prevent condensation from forming.
Dust Generously with Powdered Sugar: This helps absorb excess moisture and prevents sticking.
Refrigerate Wrapped: Once assembled, wrap the pumpkin roll tightly in plastic wrap and store it in the fridge to maintain freshness.
How to Make Pumpkin Roll Not Sticky?
To prevent a sticky pumpkin roll:
Bake Properly: Ensure the sponge is fully baked but not overdone. Underbaking leaves excess moisture.
Cool in a Powdered Sugar-Dusted Towel: This prevents the sponge from absorbing humidity as it cools.
Chill Before Slicing: Refrigerating the assembled roll firms it up and minimizes stickiness.
Why Did My Pumpkin Bread Come Out Gummy?
A gummy texture can result from overmixing, using too much pumpkin, or underbaking. To avoid this:
Measure Ingredients Precisely: Use the exact amount of Libby’s 100% Pure Pumpkin called for in the recipe.
Fold Gently: When combining wet and dry ingredients, fold gently to avoid overworking the batter.
Bake Thoroughly: Check doneness by inserting a toothpick in the center—it should come out clean.
How Can I Store and Reuse Leftover Pumpkin Roll?
Storage: Wrap leftovers tightly in plastic wrap and refrigerate for up to 3-5 days.
Freezing: For longer storage, wrap in plastic wrap and aluminum foil, then freeze for up to 3 months.
Reuse: Leftover slices can be crumbled into parfaits, added to milkshakes, or used as a topping for ice cream.
Conclusion
Congratulations! By now, you’ve learned how to masterfully prepare, bake, and assemble Libby’s Pumpkin Roll Recipe, troubleshoot common issues, and store your dessert like a pro. This dessert isn’t just about the taste—it’s a beautiful centerpiece for any fall gathering, a treat that brings warmth and joy to the table.
Final Thoughts on Mastering Libby’s Pumpkin Roll with Cream Cheese Filling
- Practice Makes Perfect
- Don’t be discouraged if your first attempt isn’t flawless. Each roll you make will refine your skills, and even if it isn’t perfect, it’ll still taste delicious!
- Experiment with Flavors
- While the classic recipe is unbeatable, don’t hesitate to customize it. Try adding nuts, swapping vanilla extract for maple syrup, or experimenting with different spices to make the recipe your own.
- Enjoy the Process
- Baking a Pumpkin Roll with Cream Cheese Filling isn’t just about the result; it’s about the experience. Savor the moments of mixing, rolling, and creating something from scratch for your loved ones.
- Share the Joy
- Pumpkin rolls are perfect for gifting during the holidays. Wrap a slice or two in festive packaging, and share this cozy treat with family and friends.
Remember These Key Tips for Success
- Roll the sponge while warm to avoid cracks.
- Cool completely before filling to ensure a smooth, mess-free assembly.
- Chill the roll before slicing for clean, picture-perfect servings.
- Store leftovers properly to enjoy this dessert for days to come—or freeze for later!

