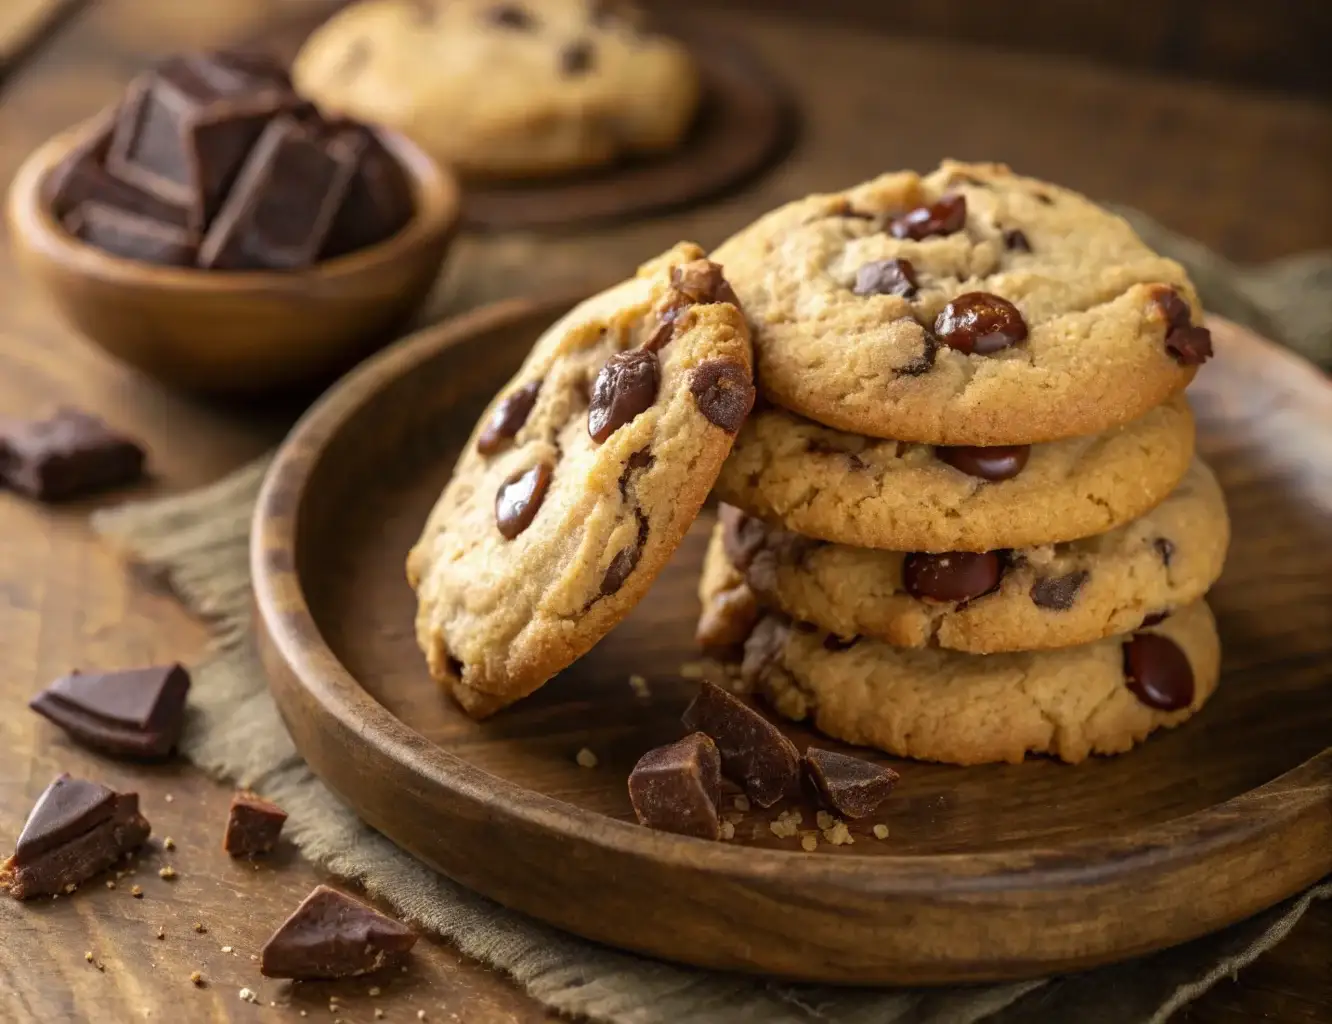

Looking for the best cookies and cream cake pop recipe? These bite-sized treats are made with moist vanilla cake, crushed Oreos, and creamy frosting, all coated in a rich chocolate shell. Whether you’re baking for a party, a special gift, or a simple homemade dessert, this easy cookies and cream cake pop recipe will be your go-to guide.
In this article, you’ll learn:
- How to prepare the perfect cake base
- The best way to mix and shape cake pops
- Three creative decorating ideas
- Tips for smooth dipping and long-lasting freshness
👉 Want to try another delicious cake recipe? Check out our Easy White Cake Recipe for a light and fluffy base!
Introduction to Cookies and Cream Cake Pops
What Makes This Cookies and Cream Cake Pop Recipe Special?
Cake pops are small, bite-sized cake balls coated in chocolate and served on a stick, similar to a lollipop. They were popularized by bakeries and coffee shops like Starbucks and have become a trendy treat for birthdays, weddings, and dessert tables.
Unlike traditional cakes, cake pops are made by crumbling baked cake and mixing it with frosting to form a dough-like consistency. This mixture is then shaped into balls, dipped in melted chocolate, and decorated with sprinkles, crushed cookies, or drizzled chocolate.
Why Cookies and Cream Flavor?
cookies and cream cake pop recipe is a classic combination loved by both kids and adults. It blends the crunch of chocolate cookies (like Oreos) with the smoothness of vanilla frosting, creating a perfect balance of textures and flavors.
This flavor works exceptionally well in cake pops because:
- The crushed Oreos add a delightful crunch.
- The vanilla cake base complements the rich chocolate coating.
- It’s a fun twist on traditional chocolate or vanilla cake pops.
If you love Oreos, this cake pop recipe will quickly become your favorite!
Essential Tools and Ingredients
Before we start, gather the essential tools and ingredients to make the process smooth and enjoyable.
Tools You’ll Need:
✔ Mixing bowls
✔ Electric hand mixer or stand mixer
✔ Food processor or rolling pin (to crush Oreos)
✔ Cake pop sticks
✔ Baking tray or cake pop stand
✔ Melon baller or small cookie scoop
✔ Parchment paper
✔ Tall cups for dipping (optional)
Key Ingredients:
| Ingredient | Quantity | Purpose |
|---|---|---|
| Vanilla cake | 4 cups, crumbled | Forms the base of the cake pops |
| Oreo cookies | 1 cup, crushed | Adds cookies and cream cake pop recipe flavor |
| Vanilla buttercream | ½ cup | Binds the cake mixture |
| White chocolate chips | 12 oz | For dipping and decoration |
| Semi-sweet chocolate chips | 24 oz | Main chocolate coating |
| Cake pop sticks | As needed | Helps hold the cake pops |
Preparing the Cake Base for Cake Pops
The foundation of a delicious cookies and cream cake pop recipe is a perfectly baked cake. Whether you choose to bake from scratch or use a store-bought cake mix, the key is to create a moist, flavorful base that blends well with the crushed Oreos and frosting.
Homemade vs. Store-Bought Cake
You have two options for the cake base:
- Homemade Vanilla Cake – Baking a fresh cake gives you full control over the texture and flavor. A simple vanilla sponge cake works best for cookies and cream cake pop recipe.
- Boxed Cake Mix – If you’re short on time, a vanilla or white cake mix is a great alternative. Just follow the package instructions for baking.
Easy Vanilla Cake Recipe (For a Homemade Base)
If you prefer making your cake from scratch, use this simple vanilla cake recipe:
Ingredients:
✔ 2 ½ cups all-purpose flour
✔ 2 ½ tsp baking powder
✔ ½ tsp salt
✔ 1 cup unsalted butter (room temperature)
✔ 1 ¾ cups granulated sugar
✔ 4 large eggs
✔ 1 tbsp vanilla extract
✔ 1 cup whole milk
Instructions:
- Preheat your oven to 350°F (175°C) and grease a 9×13-inch baking pan.
- In a medium bowl, whisk together flour, baking powder, and salt. Set aside.
- In a large mixing bowl, cream the butter and sugar until light and fluffy.
- Add eggs one at a time, mixing well after each addition. Stir in vanilla extract.
- Gradually add the dry ingredients to the wet mixture, alternating with milk. Mix until smooth.
- Pour the batter into the prepared pan and bake for 30-35 minutes, or until a toothpick inserted in the center comes out clean.
- Let the cake cool completely before crumbling it into fine pieces.
Crumbing the Cake for Perfect Texture
Once your cake is completely cool, it’s time to turn it into crumbs. This step is crucial for achieving a smooth cake pop texture.
How to Crumble the Cake Properly
- Break the cake into large pieces and place them in a large mixing bowl.
- Use clean hands to crumble the cake into fine crumbs. If you prefer, you can use a food processor, but be careful not to over-process it into a paste.
- Check for large chunks and break them down until the crumbs are uniform in size.
Making the cookies and cream cake pop recipe Mixture
Now that your vanilla cake is crumbled into fine, soft pieces, it’scookies and cream cake pop recipe cookies and cream cake pop recipe mixture. This step is crucial for ensuring the right texture—too dry, and the cake pops will fall apart; too wet, and they won’t hold their shape.
Combining the Ingredients

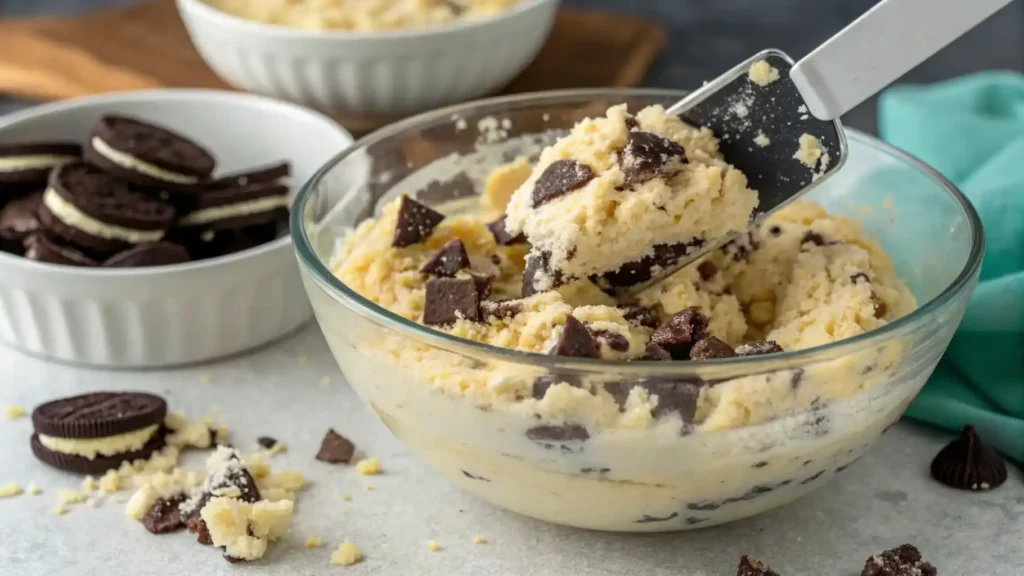
To create the best cookies and cream cake pop recipe mixture, you’ll need:
| Ingredient | Quantity | Purpose |
|---|---|---|
| Crumbled vanilla cake | 4 cups | Forms the cake pop base |
| Crushed Oreo cookies | 1 cup (divided) | Adds crunch and flavor |
| Vanilla buttercream | ½ cup | Binds the mixture together |
Step-by-Step Mixing Process:
1️⃣ Crush the Oreos – Place the Oreos in a ziplock bag and crush them using a rolling pin, or pulse them in a food processor until finely ground. Set aside ¼ cup of the crushed Oreos for decorating later.
2️⃣ Mix Cake and Oreos – In a large mixing bowl, combine the crumbled cake and ¾ cup of crushed Oreos. Stir together evenly.
3️⃣ Add the Buttercream – Pour in ½ cup of vanilla buttercream frosting. Using a rubber spatula (or clean hands), mix until the ingredients are well combined and a dough-like consistency forms.
Chilling the Mixture for Easy Rolling
Once the cake mixture is well combined, cover the bowl with plastic wrap and refrigerate for at least 1 hour. This step helps firm up the mixture, making it easier to roll into uniform cake balls.
Why Chilling Is Important:
✔ Prevents cake pops from crumbling when rolling
✔ Helps hold their shape when inserting sticks
✔ Makes dipping in chocolate smoother
After chilling, the dough is ready to be shaped into cake balls! In the next section, we’ll cover how to properly roll and insert sticks for perfect cake pops.
Shaping and Inserting the Sticks
Now that your cookies and cream cake pop recipe mixture is chilled and firm, it’s time for the fun part—rolling them into cake balls and getting them ready for dipping! With the right techniques, you’ll achieve perfectly shaped cake pops that stay on their sticks without slipping or cracking.
Rolling the Cake Balls Evenly
Creating uniform cake balls ensures even cooking and a professional look. Let’s get rolling!
How to Roll Cake Balls:
- Scoop the Mixture: Use a melon baller or small cookie scoop to portion out equal amounts of the cake mixture. This helps maintain consistent sizes.
- Roll into Balls: With clean hands, gently roll each portion into a smooth ball. If the mixture feels sticky, lightly coat your hands with powdered sugar or cocoa powder.
- Place on a Tray: Set the rolled balls on a baking sheet lined with parchment paper. Leave a bit of space between each to prevent sticking.
Inserting Cake Pop Sticks Correctly
This step is key to making sure your cake pops stay put during dipping!
Securing the Sticks:
- Melt a Little Chocolate: Melt a small amount of white or semi-sweet chocolate in a microwave-safe bowl.
- Dip the Sticks: Dip the tip of each cake pop stick about ½ inch into the melted chocolate. This acts as a “glue” to secure the stick in the cake ball.
- Insert the Stick: Push the chocolate-coated stick halfway into each cake ball. Be careful not to push too far, or the ball might crack.
- Chill Again: Once all the sticks are inserted, place the tray in the refrigerator for about 15 minutes. This helps the chocolate harden and keeps the sticks firmly in place.
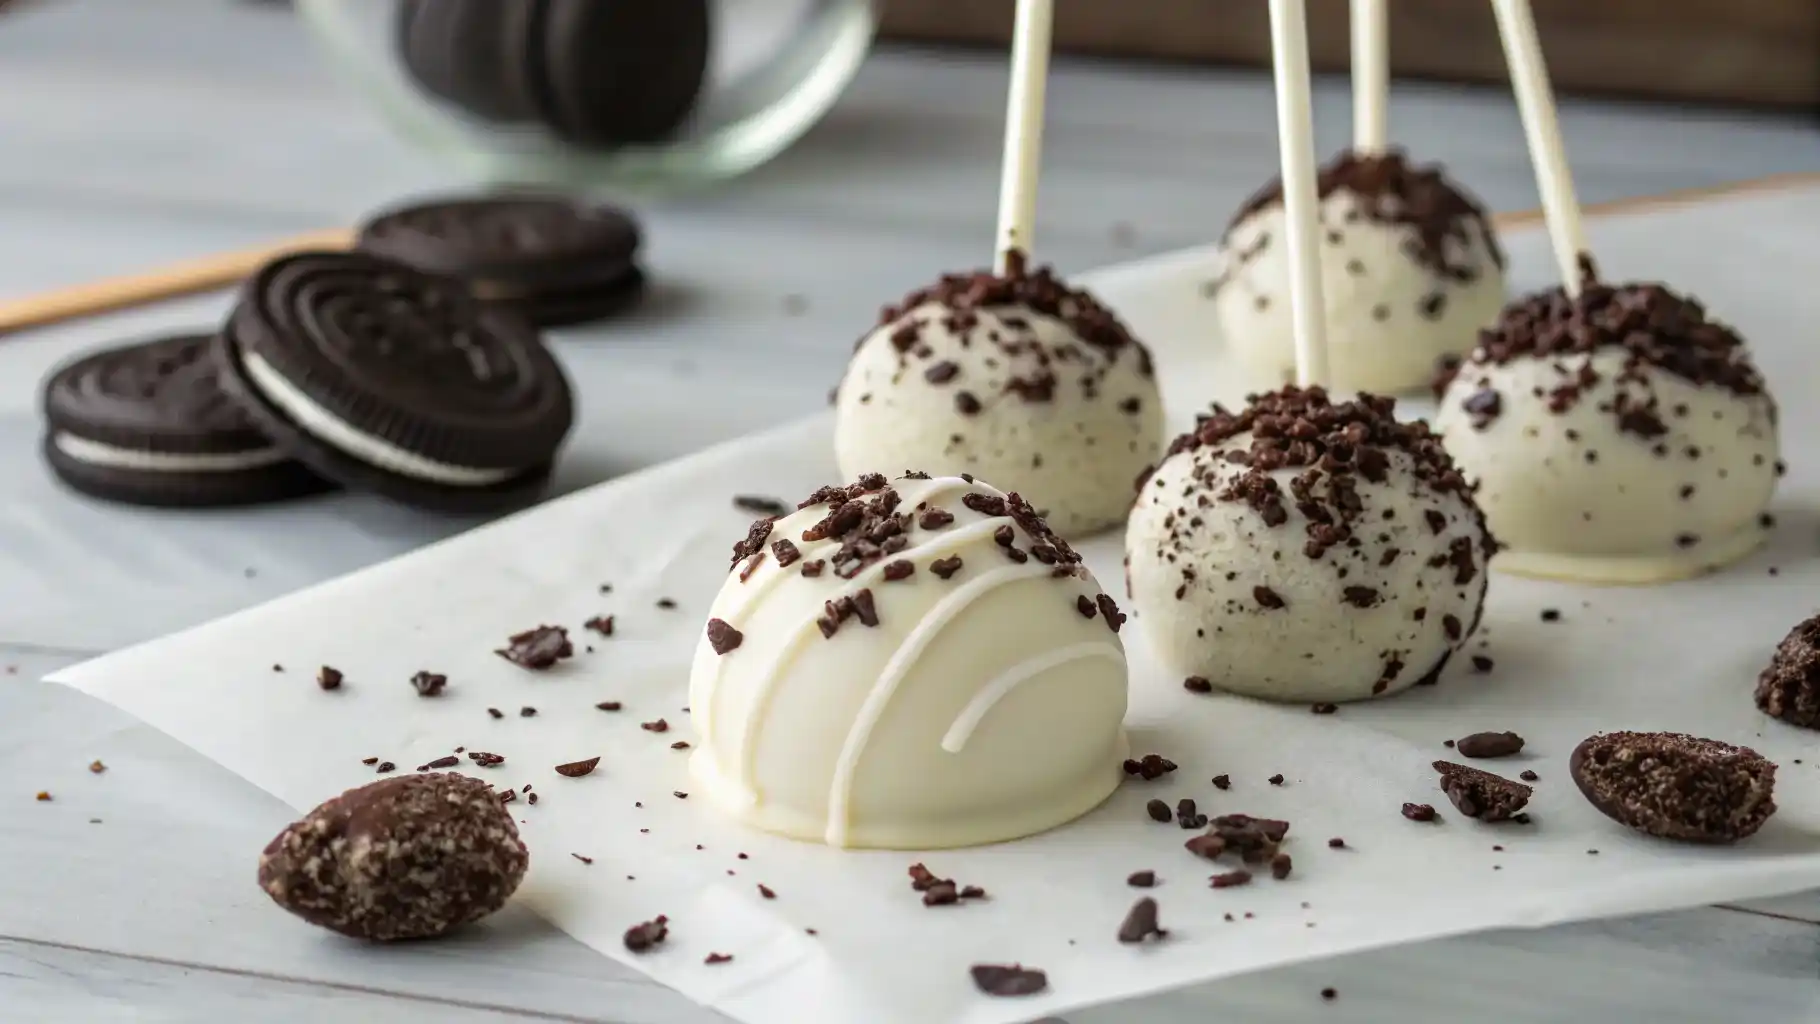
Dipping and Decorating the Cake Pops
Now that your cookies and cream cake pop recipe are shaped and secured on their sticks, it’s time to coat them in rich, delicious chocolate! This step is crucial to achieving a smooth, professional-looking finish. We’ll also explore three creative ways to decorate them for a stunning final result.
Choosing the Right Chocolate Coating
For this recipe, we’ll use both white chocolate and semi-sweet chocolate to complement the cookies and cream cake pop recipe flavor.
Best Chocolate for Dipping:
| Chocolate Type | Flavor Profile | Why It’s Great for Cake Pops |
|---|---|---|
| White Chocolate | Sweet, creamy | Enhances the cookies and cream look |
| Semi-Sweet Chocolate | Rich, slightly bitter | Balances the sweetness of the cake |
| Candy Melts | Various colors and flavors | Best for themed decorations |
Melting the Chocolate Properly
Smooth, lump-free melted chocolate makes dipping easy.
Microwave Method:
- Place chocolate chips in a microwave-safe bowl.
- Heat in 30-second intervals, stirring after each, until fully melted.
- Optional: Add ½ teaspoon of vegetable oil or coconut oil for a thinner consistency.
Double Boiler Method:
- Fill a pot with 1-2 inches of water and bring to a simmer.
- Place a heatproof bowl over the pot, making sure it doesn’t touch the water.
- Add chocolate and stir continuously until melted and smooth.
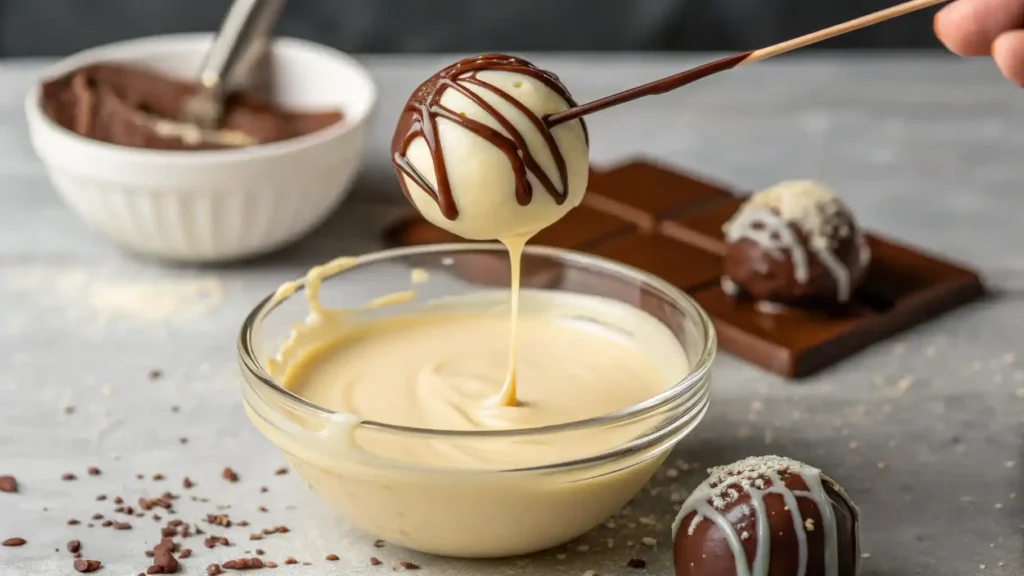
Dipping the Cake Pops
- Prepare Your Setup: Pour the melted chocolate into a tall cup or mug. This makes dipping easier and gives even coverage.
- Dip at an Angle: Holding the stick, dip the cake pop into the chocolate at an angle, then slowly turn it to coat evenly.
- Let Excess Chocolate Drip: Gently tap the stick on the edge of the cup to remove excess chocolate. Twirl slightly for an even coat.
- Set to Dry: Stick the dipped cake pops into a piece of styrofoam or a cake pop stand to dry.
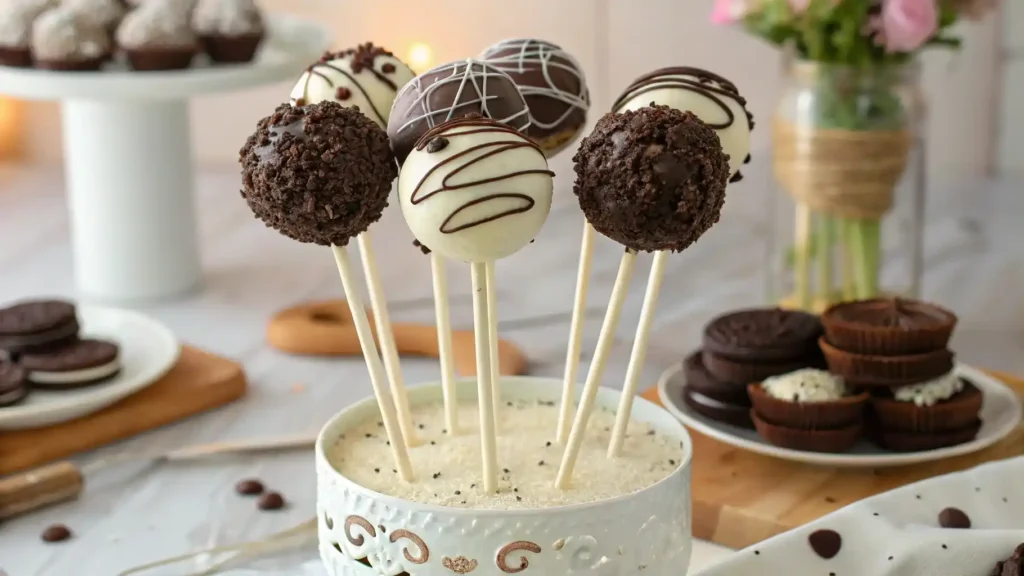
Three Fun Ways to Decorate Cookies and Cream Cake Pops
Once dipped, you can decorate the cake pops in a variety of ways. Here are three simple but eye-catching designs:
1. Classic Cookies and Cream Dip
✔ Dip in semi-sweet chocolate, let set, then dip halfway into white chocolate.
✔ Before the white chocolate sets, sprinkle with reserved crushed Oreos.
2. Oreo-Covered Cake Pops
✔ Dip in white chocolate and immediately roll in crushed Oreos for a crunchy coating.
✔ Let set on parchment paper with the stick facing up.
3. Drizzled Chocolate Design
✔ Dip in semi-sweet chocolate and let set.
✔ Use a spoon or piping bag to drizzle white chocolate over the top for a decorative finish.
Tips for Perfect Cake Pops Every Time
Making cake pops may seem simple, but small mistakes can lead to cracks, falling cake balls, or uneven chocolate coatings. Here are expert tips to ensure your cookies and cream cake pop recipe turn out perfect every time!
Avoiding Cracks and Melting Issues
Cracks in cake pops often happen when the chocolate coating hardens too quickly or the temperature difference between the cake and melted chocolate is too high.
How to Prevent Cracks:
✔ Let the cake balls reach a slightly cool, but not cold, temperature before dipping (around 10 minutes out of the fridge).
✔ Avoid overheating the chocolate. It should be warm, not too hot.
✔ Dip gently and avoid pressing too hard when tapping off excess chocolate.
How to Get a Smooth Chocolate Coating
A smooth, professional-looking finish makes cake pops look extra polished. Here’s how to achieve it:
Tips for a Perfect Coating:
✔ Use high-quality chocolate (avoid waxy, cheap chocolate).
✔ Add ½ teaspoon of vegetable or coconut oil to melted chocolate to thin it out.
✔ Dip in one smooth motion—don’t swirl the cake pop in the chocolate!
✔ Let excess chocolate drip off naturally instead of tapping too hard.
How to Keep Cake Pops from Falling Off the Stick
Few things are more frustrating than a cake pop sliding down or falling off the stick after dipping. Here’s how to prevent that from happening:
✔ Use the chocolate “glue” method – Always dip the stick into melted chocolate before inserting it into the cake ball.
✔ Make sure the cake pop mixture isn’t too dry – A little extra frosting can help it stick together.
✔ Chill cake balls before dipping, but don’t freeze them – Freezing makes them expand and contract, causing cracks.
Storing and Serving Cake Pops
Now that your cookies and cream cake pop recipe are perfectly dipped and decorated, you’ll want to store them properly to maintain their freshness. Whether you’re making them ahead for a party or saving leftovers, here’s how to keep them tasting amazing.
How to Store Cake Pops Properly
Cake pops can last for several days when stored correctly. The key is to keep them fresh without letting the chocolate coating become sticky or the cake inside dry out.
Short-Term Storage (1-2 Days)
✔ Store cake pops at room temperature in an airtight container.
✔ If using a cake pop stand, loosely cover them with plastic wrap or foil.
✔ Keep them away from direct sunlight and heat, which can melt the chocolate.
Refrigerator Storage (Up to 1 Week)
✔ Place cake pops in an airtight container with a paper towel lining the bottom to absorb moisture.
✔ If stacking, separate layers with parchment paper.
✔ Before serving, let them sit at room temperature for 15 minutes to prevent condensation.
Freezer Storage (Up to 2 Months)
✔ Wrap each cake pop individually in plastic wrap, then place them in a freezer-safe ziplock bag.
✔ When ready to eat, thaw in the fridge overnight, then bring to room temperature before serving.
Serving Suggestions for Special Occasions
Cake pops are not just delicious—they’re also a fun and stylish treat! Here are some creative ways to serve them:
🎉 Party Dessert Table – Arrange cake pops in a decorative holder or stick them into a foam block covered in wrapping paper.
🎁 Gift Boxes – Wrap them in clear treat bags with ribbons for a cute, edible gift.
🍰 Cake Pop Bouquet – Place them in a jar filled with decorative sprinkles for a stunning centerpiece.
🎃 Holiday-Themed Cake Pops – Use colored candy melts and themed sprinkles for Christmas, Halloween, or Valentine’s Day!
FAQs
1. What is the trick to making cake pops?
The key to making perfect cake pops is getting the right consistency in the cake mixture and using proper dipping techniques. Here are a few tricks:
✔ Use the right ratio of cake to frosting – Too much frosting makes them too soft, too little makes them crumbly.
✔ Chill the cake balls before dipping – This helps them hold their shape and prevents them from falling apart.
✔ Use melted chocolate as a “glue” for the sticks – This keeps them securely in place.
✔ Dip in smooth, warm chocolate – Avoid overheating, and stir frequently for an even coating.
2. What flavor is the cookies and cream cake pop recipe?
cookies and cream cake pop recipe have a rich, creamy vanilla flavor with a crunchy Oreo twist. The cake inside is soft and moist, while the coating provides a smooth chocolatey shell. It’s similar to the famous Oreo cheesecake flavor but in bite-sized form!
3. What’s the difference between a cake pop and a cake?
| Feature | Cake Pops | Traditional Cake |
|---|---|---|
| Shape | Small, round, bite-sized | Large, typically in slices |
| Texture | Dense and fudgy (mixed with frosting) | Light and fluffy |
| Coating | Dipped in melted chocolate | Covered in frosting or glaze |
| Eating Style | On a stick, handheld | Served on a plate with utensils |
Cake pops are essentially a portable, mess-free version of cake, making them great for parties and celebrations!
4. What are the ingredients in Starbucks cake pops?
Starbucks cake pops typically contain:
✔ Cake crumbs (vanilla or chocolate)
✔ Buttercream frosting (to hold the cake together)
✔ Candy melts or chocolate coating (for dipping)
✔ Decorations (sprinkles, drizzle, or colored sugar)
The Starbucks cookies and cream cake pop recipe follows a similar recipe, using crushed Oreos to create the signature flavor.
5. How to make cake recipe?
Making a basic vanilla cake is simple! Follow these steps:
- Preheat oven to 350°F (175°C) and grease a baking pan.
- Whisk dry ingredients – 2 ½ cups flour, 2 ½ tsp baking powder, ½ tsp salt.
- Cream butter and sugar – Beat 1 cup butter and 1 ¾ cups sugar until fluffy.
- Add eggs and vanilla – Mix in 4 eggs and 1 tbsp vanilla extract.
- Alternate adding flour and milk – Gradually add flour mixture and 1 cup milk, mixing until smooth.
- Bake for 30-35 minutes – Check with a toothpick for doneness.
- Let it cool before crumbling for cake pops.
6. What is the cheapest thing at Starbucks?
If you’re looking for the most budget-friendly Starbucks items, here are some of the cheapest options:
✔ Espresso shot – Usually under $2
✔ Short brewed coffee – A small hot coffee for around $2
✔ Plain bagel or croissant – Affordable bakery options
✔ Cake pops – One of the least expensive desserts on the menu (around $2.95)
Conclusion
cookies and cream cake pop recipe are the perfect combination of moist vanilla cake, crushed Oreos, and creamy frosting, all coated in rich chocolate. Whether you’re making them for a party, a special gift, or just a fun treat at home, this recipe is easy to follow and guarantees delicious results.