
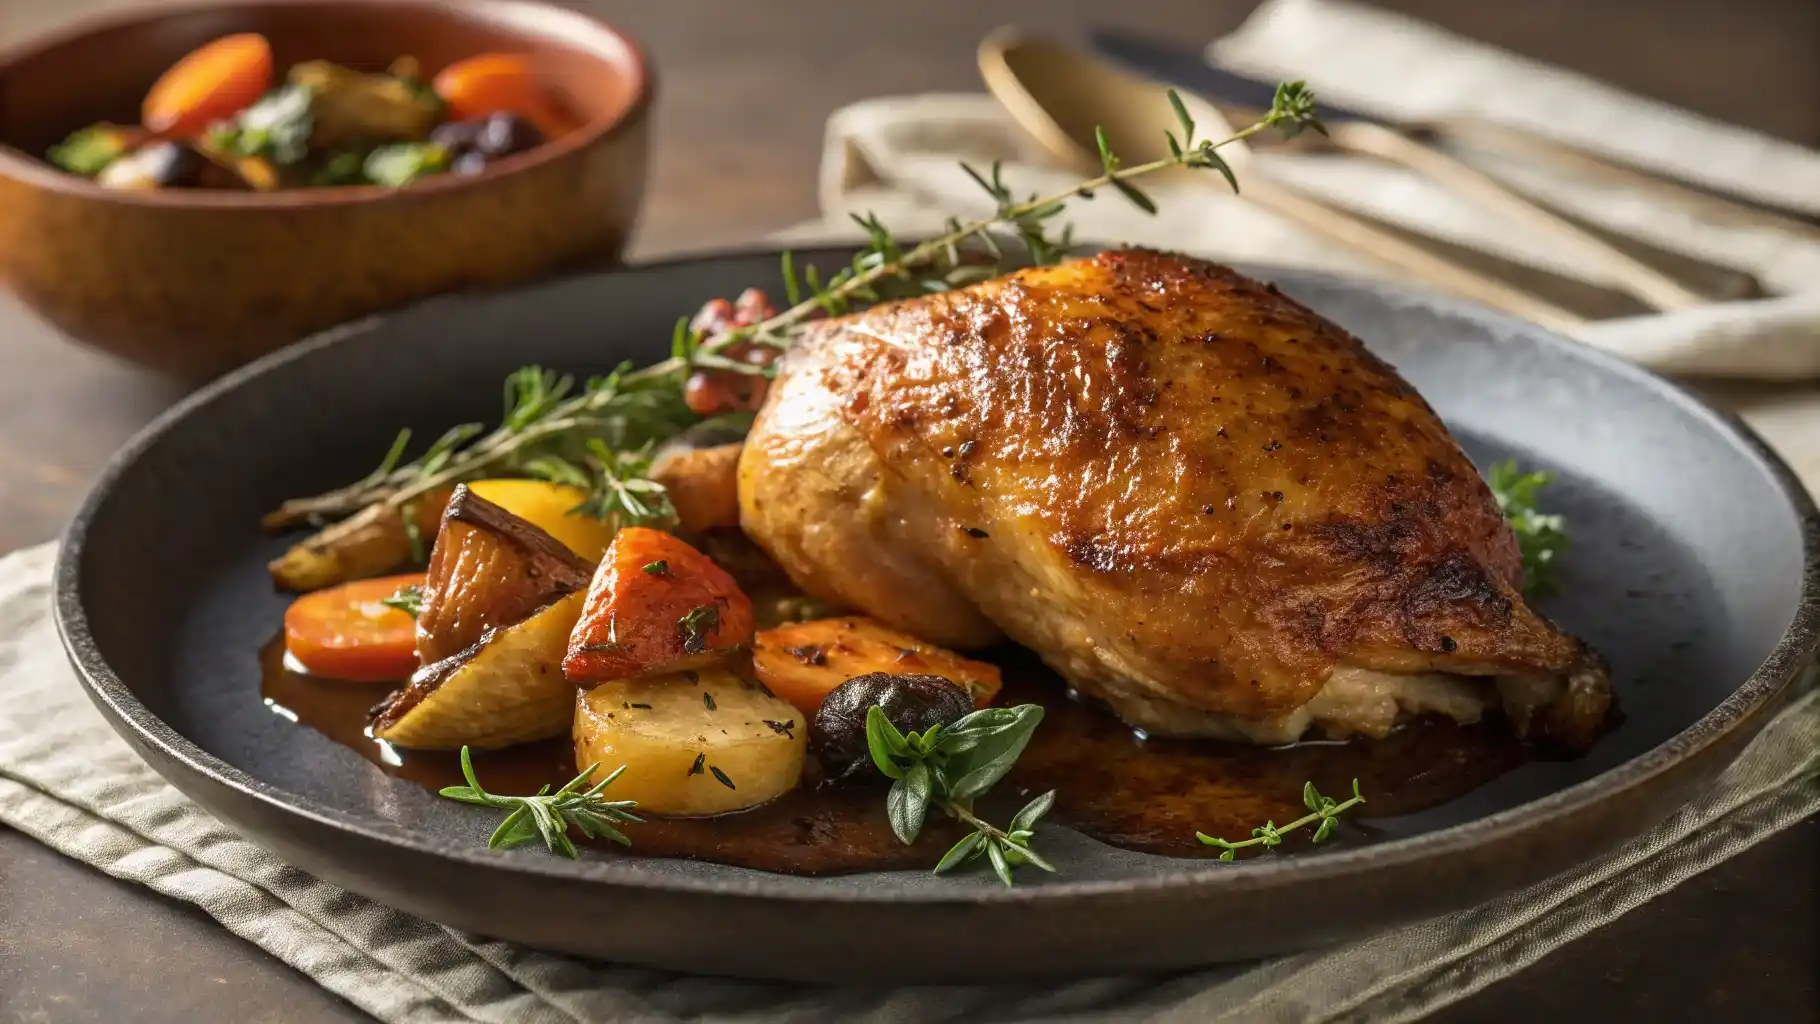
Oven-braised chicken with crispy skin recipe is the perfect way to enjoy tender, juicy meat with a golden, crunchy crust. Many home cooks struggle to achieve crispy skin when braising, but with the right techniques, you can get restaurant-quality results at home.
Braising is a time-tested cooking method that combines slow-cooking in liquid with a high-heat finish, ensuring that the chicken remains moist while the skin turns crispy. Whether you’re making a cozy family dinner or meal prepping for the week, this foolproof Oven-braised chicken with crispy skin recipe will become a staple in your kitchen.
For more delicious meal ideas, check out our best mashed potato bacon pizza recipe—a perfect side dish to complement your crispy braised chicken!
In this guide, we’ll walk you through the best Oven-braised chicken with crispy skin recipe, covering proper preparation, ideal cooking temperatures, and the final crisping technique that guarantees deliciously crispy skin.
Introduction to Braised Chicken with Crispy Skin
Why Braised Chicken is the Best Cooking Method
Braising is a combination of searing and slow-cooking in liquid, resulting in deeply flavorful, fall-off-the-bone tender meat. While roasting and frying can dry out Oven-braised chicken with crispy skin recipe, braising keeps the meat juicy and prevents it from becoming tough.
The key advantage? You can get crispy skin while keeping the inside moist—a balance that most cooking methods fail to achieve.
Why Achieving Crispy Skin is a Challenge in Braising
One common issue when braising Oven-braised chicken with crispy skin recipe is that the skin becomes soft and soggy. This happens because braising involves cooking in liquid, which can trap moisture against the skin instead of allowing it to crisp up.
However, with the right techniques, you can braise chicken while still achieving that perfect crispy finish. The secret lies in proper preparation, oven temperature control, and a finishing step that transforms the skin into a golden, crackling layer of goodness.
Key Factors for Achieving Crispy Skin in Braised Chicken
To get the best of both worlds—moist, tender meat and crispy skin—you need to follow these key steps:
- Dry the Chicken Before Cooking – Moisture on the skin prevents browning.
- Sear the Chicken Before Braising – This locks in flavor and helps with crispiness.
- Use the Right Cooking Temperature – High heat is crucial for crisping up the skin.
- Finish Under the Broiler – A final blast of heat ensures maximum crispiness.
By following these essential steps, you’ll create a braised chicken dish that rivals any restaurant’s crispy masterpiece.
Understanding Braising – The Secret to Moist & Crispy Chicken
Braising is a time-tested cooking technique that delivers incredibly tender meat by combining both dry and moist heat methods. But to get that crispy, golden skin, you need to understand how braising works and how to tweak the process to achieve the perfect balance between moisture and crispiness.
What is Braising?
Braising is a slow-cooking method where food is first seared at high heat and then cooked in a flavorful liquid at a lower temperature. This technique allows tough cuts of meat to break down and become tender, absorbing all the rich flavors of the braising liquid.
For chicken, the goal is to lock in moisture while allowing the skin to crisp up. Traditional braising methods involve covering the chicken during cooking, but to get crispy skin, you’ll need to modify this approach slightly.
The Science Behind Braising Chicken
Two important reactions occur when braising chicken:
- The Maillard Reaction (Searing for Flavor & Crispiness)
- When you brown chicken in a hot pan before braising, the Maillard reaction creates deep flavors and a golden crust.
- This step is crucial for developing crispy skin later on.
- Collagen Breakdown (Tenderizing the Meat)
- As the chicken simmers in liquid, collagen in the connective tissues breaks down, making the meat juicy and tender.
- The longer it cooks, the more flavorful and succulent the chicken becomes.
By carefully controlling heat, moisture, and timing, you can create a crispy yet juicy braised chicken dish.
Why Braising is Ideal for Crispy Skin Chicken
Braising is often associated with soft, stewed meats, but when done correctly, it can yield crispy skin. Here’s why:
✅ Searing First Creates a Crispy Layer – Browning the chicken before braising sets the foundation for crispiness.
✅ Controlled Moisture Prevents Soggy Skin – Using just the right amount of liquid avoids over-steaming the skin.
✅ Finishing in the Oven Dries Out the Skin – The final blast of high heat evaporates excess moisture, leaving golden, crispy skin.
In the next section, we’ll cover how to choose the right chicken for braising, ensuring the best texture and flavor for your dish.
Choosing the Right Chicken for Braising
Selecting the right chicken is just as important as the cooking technique. The type, cut, and quality of chicken all affect the final flavor, texture, and crispiness of the skin. Let’s break down the best options to achieve perfectly braised chicken with crispy skin.
Best Cuts of Chicken for Braising
Different chicken cuts react differently to braising. Here’s a breakdown of the best options:
| Chicken Cut | Why It’s Great for Braising | Crispy Skin Potential |
|---|---|---|
| Bone-in, skin-on thighs | Higher fat content keeps the meat juicy and flavorful. | Excellent – the skin crisps up beautifully. |
| Drumsticks | Naturally tender and absorb flavors well. | Good – but skin may wrinkle slightly. |
| Whole Chicken | Creates a dramatic presentation and deep flavors. | Great – but requires careful cooking. |
| Chicken Breasts (bone-in, skin-on) | Leaner option but can dry out if overcooked. | Decent – can be crispy with the right technique. |
Best Choice: Bone-in, skin-on thighs are ideal for braising because they remain juicy, tender, and their skin crisps up beautifully.
Organic vs. Conventional Chicken – Does It Matter?
Choosing between organic and conventional chicken depends on flavor, quality, and budget:
✅ Organic Chicken:
- Raised without antibiotics or hormones.
- Often has better fat distribution, which helps with crispiness.
- More expensive, but generally more flavorful.
✅ Conventional Chicken:
- More affordable and widely available.
- May have higher water content, which can affect crispiness.
- Still works well if you properly dry and season the skin.
If your budget allows, opt for organic, pasture-raised chicken for the best flavor and texture.
The Importance of Freshness
Freshness impacts both flavor and crispiness. Here’s why:
- Fresh chicken has better texture, while older chicken can become rubbery when cooked.
- High moisture content in frozen chicken can lead to soggy skin if not dried properly.
- Where to Buy: Look for air-chilled chicken at butcher shops or farmers’ markets for the best results.
Prepping the Chicken for Maximum Crispiness
Proper preparation is the key to achieving crispy skin on braised chicken. If you skip these steps, you risk ending up with soggy, rubbery skin instead of the golden, crunchy texture you’re aiming for. Let’s go over the essential prep techniques to get that perfect balance of juicy meat and crispy skin.
1. Properly Cleaning the Chicken
Before anything else, you need to ensure the chicken is clean and safe to cook:
✅ Rinse or Not? While some people rinse chicken, the USDA recommends not washing raw poultry, as it can spread bacteria. Instead:
- Pat the chicken dry with paper towels to remove excess moisture.
- Trim off any excess fat or loose skin for a cleaner look.
✅ Sanitize After Handling: Always wash your hands, cutting boards, and utensils with soap and hot water after handling raw chicken.
2. Drying the Chicken – The Key to Crispy Skin
Moisture is the enemy of crispy skin. If the chicken skin is damp, it won’t crisp up properly.
✅ How to Dry Chicken for Maximum Crispiness:
- Pat the chicken skin thoroughly with paper towels.
- Air-dry in the fridge: Place the chicken uncovered on a rack in the fridge for at least 1 hour (overnight is even better).
- Final Pat-Down: Before cooking, check for any remaining moisture and pat it dry again.
Why this works:
- Air-drying allows excess moisture to evaporate, making the skin crispier when cooked.
- This method is used by restaurants to achieve ultra-crispy chicken skin.
3. Seasoning & Marinades for Deeper Flavor
Braising allows flavors to infuse deeply into the chicken. To maximize taste, season well before cooking.
✅ Best Dry Seasoning for Crispy Skin:
- Salt – Draws out moisture and enhances crispiness.
- Black Pepper – Adds depth to the flavor.
- Paprika or Smoked Paprika – Boosts color and richness.
- Garlic & Onion Powder – Intensifies umami flavors.
✅ Best Marinades for Braised Chicken:
If you have time, marinating the chicken can enhance juiciness and flavor. Here’s a simple garlic-herb marinade to try:
Ingredients:
- 3 tbsp olive oil
- 2 tbsp lemon juice
- 3 cloves garlic (minced)
- 1 tsp fresh thyme
- 1 tsp fresh rosemary
- 1 tsp salt
- ½ tsp black pepper
Instructions:
- Mix all ingredients in a bowl.
- Coat the chicken and let it marinate for at least 1 hour (overnight for deeper flavor).
- Before cooking, pat the skin dry again to remove excess moisture.
The Braising Process – Step-by-Step Guide
Now that your chicken is prepped, it’s time to braise it to perfection while ensuring the skin stays crispy. This step-by-step guide will walk you through browning, braising, and crisping the chicken for the best results.
Step 1: Browning the Chicken for Crispy Skin

The first step in braising is searing the chicken to create a flavorful, crispy crust.
✅ How to Brown Chicken for Maximum Crispiness:
- Use the Right Pan – A heavy-duty pan like a Dutch oven or cast-iron skillet holds heat well, ensuring an even sear.
- Heat the Pan First – Preheat over medium-high heat and add 1 tbsp oil (olive oil, avocado oil, or butter).
- Place the Chicken Skin-Side Down – Press gently so all the skin touches the pan. Let it sear undisturbed for 4-5 minutes until golden brown.
- Flip & Sear the Other Side – Cook for another 2-3 minutes to develop flavor.
- Remove & Set Aside – Once browned, transfer chicken to a plate.
Step 2: Choosing the Right Liquid for Braising
The braising liquid infuses the chicken with deep flavor. A mix of broth, wine, and aromatics works best.
✅ Best Liquids for Braising Chicken:
- Chicken broth – The go-to for classic braised chicken.
- White wine – Adds depth and richness.
- Apple cider or beer – Adds a subtle sweetness and complexity.
- Coconut milk – For a creamy, tropical variation.
🍷 Classic White Wine Braising Liquid Recipe:
- 1 cup chicken broth
- ½ cup white wine
- 1 tbsp Dijon mustard
- 3 cloves garlic, minced
- 1 tsp thyme
- 1 tsp paprika
- Salt & pepper to taste
Step 3: Braising the Chicken in the Oven

- Deglaze the Pan – Pour in your braising liquid and scrape up browned bits (this is where the flavor is!).
- Nestle the Chicken into the Liquid – Keep the skin above the liquid to maintain crispiness.
- Cover & Transfer to the Oven – Cook at 325°F (163°C) for 45-60 minutes.
- Check Internal Temperature – The chicken should reach 165°F (75°C).
Step 4: Finishing for Extra Crispiness
Once the chicken is braised, it’s time for the final crisping step.
✅ How to Finish Chicken for Ultimate Crispiness:
- Remove the Lid & Increase Heat to 425°F (218°C).
- Let the Chicken Roast for 10-15 Minutes – This helps evaporate any remaining moisture from the skin.
- For Extra Crispiness, Broil for 2-3 Minutes.
Achieving the Crispiest Chicken Skin in the Oven
Now that your chicken is braised to perfection, it’s time to maximize that crispy skin. The key to achieving ultra-crispy, golden-brown skin is all about temperature control, moisture management, and finishing techniques.
1. What Temperature Do You Braise Chicken in the Oven?
The right temperature ensures that your chicken becomes tender while keeping the skin from becoming rubbery.
| Temperature (°F) | Purpose |
|---|---|
| 325°F (163°C) | Low & slow braising for tenderness |
| 375°F (190°C) | Balanced cooking for juiciness & mild crispiness |
| 425°F (218°C) | Best for crispy skin in final step |
| Broil (450-500°F / 232-260°C) | Last-minute blast for ultimate crispiness |
2. How Long Should You Braise Chicken for Best Results?
Cooking time depends on the cut and size of your chicken.
| Chicken Cut | Braising Time at 325°F |
|---|---|
| Bone-in thighs | 45-60 minutes |
| Drumsticks | 40-50 minutes |
| Whole chicken | 75-90 minutes |
Final crisping: After braising, cook at 425°F for 10-15 minutes and broil for 2-3 minutes for extra crunch.
3. The Secret to Crispy Chicken Skin After Braising

To get the crispiest skin possible, follow these techniques:
✅ Leave the Skin Above the Liquid – Keeps it from getting soggy.
✅ Use a Wire Rack or Roasting Pan – Allows air to circulate, crisping up all sides.
✅ Baste with Butter or Oil Before Final Roast – Enhances browning and crispiness.
✅ Broil for 2-3 Minutes at the End – Watch closely to prevent burning.
Flavor Boosters – Elevating Your Braised Chicken
Now that your chicken is crispy and perfectly braised, it’s time to take it to the next level with herbs, spices, vegetables, and sauces. These ingredients will add depth, aroma, and richness to your dish, making it even more irresistible.
1. Best Herbs and Spices for Braised Chicken
Seasoning plays a crucial role in enhancing the natural flavors of the chicken. Here are some of the best herbs and spices to use:
| Herb/Spice | Flavor Profile | Best Pairings |
|---|---|---|
| Thyme | Earthy & aromatic | Garlic, butter, white wine |
| Rosemary | Woody & slightly citrusy | Lemon, olive oil, black pepper |
| Paprika | Smoky & slightly sweet | Onion, garlic, tomato-based sauces |
| Cumin | Warm & nutty | Chili powder, coriander, cinnamon |
| Smoked Paprika | Deep, smoky flavor | BBQ-style braising liquids |
| Bay Leaves | Subtle herbal notes | Broths, wine, braising liquids |
2. Vegetables to Braise with Chicken
Adding vegetables to the braising liquid not only enhances the flavor of the dish but also gives you a built-in side dish!
| Vegetable | Why It Works |
|---|---|
| Carrots | Adds natural sweetness and absorbs braising flavors. |
| Onions & Shallots | Brings a deep, savory aroma and enhances the sauce. |
| Garlic | Intensifies the overall flavor and infuses into the liquid. |
| Mushrooms | Absorbs flavors and adds an umami depth. |
| Potatoes | Turns creamy and flavorful when braised in the sauce. |
| Celery | Adds a subtle peppery flavor to balance the richness. |
3. Pairing Sauces and Gravies with Braised Chicken
A rich sauce or gravy can bring your braised chicken to life. Here are some delicious options:
🍷 Classic White Wine Pan Sauce
Perfect for a light, elegant finish.
✅ Ingredients:
- ½ cup white wine
- 1 cup chicken broth
- 1 tbsp butter
- 1 tsp Dijon mustard
- 2 cloves garlic, minced
✅ How to Make It:
- After removing the chicken, deglaze the pan with white wine.
- Add broth and simmer for 5 minutes.
- Whisk in butter and Dijon mustard.
- Pour over the crispy braised chicken and enjoy!
🍅 Tomato & Herb Braising Sauce
Great for a Mediterranean-style dish.
✅ Ingredients:
- 1 cup diced tomatoes
- ½ cup chicken broth
- 1 tsp oregano
- 1 tsp smoked paprika
- 2 cloves garlic, minced
✅ How to Make It:
- Sauté garlic in olive oil.
- Add tomatoes, broth, and spices, then simmer.
- Pour over the chicken or serve on the side.
Serving & Storing Braised Chicken
Now that your crispy braised chicken is cooked to perfection, let’s talk about the best ways to serve, present, store, and reheat it while keeping that skin crunchy and the meat juicy.
1. Best Side Dishes for Braised Chicken
Pairing your chicken with the right sides enhances the meal. Here are some great options:
| Side Dish | Why It Works |
|---|---|
| Creamy Mashed Potatoes | Absorbs the braising sauce and balances flavors. |
| Garlic Roasted Vegetables | Adds a healthy, slightly crunchy contrast. |
| Buttery Rice Pilaf | Light, fluffy, and perfect with a rich braising sauce. |
| Crusty Bread | Ideal for soaking up flavorful pan juices. |
| Lemon & Herb Couscous | Bright and refreshing with the deep flavors of braised chicken. |
| Parmesan Polenta | Creamy and comforting with a slight nuttiness. |
2. Presentation Tips for Aesthetic Appeal
How you present your dish makes a big difference! Here’s how to make your crispy braised chicken look as amazing as it tastes:
✅ Use a large serving platter – Arrange the chicken with roasted vegetables around it.
✅ Drizzle with sauce – A light spoonful of reduced braising liquid adds shine.
✅ Garnish for freshness – Sprinkle fresh herbs like parsley, thyme, or rosemary.
✅ Slice strategically – If serving a whole chicken, slice it cleanly and evenly.
3. How to Store Leftover Braised Chicken Properly
Want to enjoy your crispy braised chicken later? Follow these steps to store it correctly:
✅ Refrigerate Properly:
- Let the chicken cool to room temperature before storing.
- Store in an airtight container to keep it from drying out.
- Refrigerate for up to 4 days.
✅ Freezing for Later:
- Place in a sealed freezer bag with a little braising sauce to prevent drying.
- Freeze for up to 3 months.
- Thaw overnight in the fridge before reheating.
4. Best Way to Reheat Braised Chicken Without Losing Crispiness
Reheating improperly can ruin the crispy skin. Here’s how to bring back that crunch:
| Reheating Method | Effectiveness | Instructions |
|---|---|---|
| Oven (Best Option) | 🔥🔥🔥🔥🔥 | Preheat to 375°F (190°C), place chicken on a rack, heat for 15 minutes. |
| Air Fryer | 🔥🔥🔥🔥 | Set to 375°F, reheat for 5-7 minutes for a quick crisp. |
| Stovetop (Skin-Side Down) | 🔥🔥🔥 | Heat in a dry pan over medium heat for 4-5 minutes. |
| Microwave (Worst Option) | 🔥 | Avoid if possible—makes the skin soft and rubbery. |
FAQs
1. How to Keep Chicken Skin Crispy When Braising?
✅ Keep the skin above the liquid – If it sits in the braising liquid, it will turn soft.
✅ Pat the skin completely dry before cooking – Moisture prevents crisping.
✅ Finish at high heat (425°F) or under the broiler to evaporate excess moisture.
✅ Use a wire rack in the roasting pan to allow airflow for even crisping.
2. What Temperature Do You Braise Chicken in the Oven?
Braising requires low and slow cooking for tender meat, followed by high heat to crisp the skin.
| Stage | Temperature (°F) | Purpose |
|---|---|---|
| Braising | 325°F (163°C) | Cooks chicken gently, keeping it juicy. |
| Crisping | 425°F (218°C) | Dries out the skin for maximum crunch. |
| Broiling (Optional) | 450-500°F (232-260°C) | Adds a golden, crispy finish. |
3. What Makes Chicken Skin Crispy in the Oven?
Crispy skin comes down to three essential factors:
🔥 High Heat: Cooking at 425°F or broiling evaporates moisture from the skin.
💨 Dry Skin: The drier the skin before cooking, the crispier it gets.
🧂 Salt & Fat: Salt draws out excess moisture, and a light oil or butter coating helps browning.
4. What Is the Secret to Crispy Chicken?
The biggest secrets to restaurant-quality crispy skin are:
✅ Dry the skin before cooking – Moisture is the enemy of crispiness.
✅ Sear first in a hot pan – This locks in flavor and creates a crust.
✅ Cook at the right temperature – Low heat for tenderness, high heat for crisping.
✅ Finish under the broiler – The final step for that crackling, golden skin.
5. How to Get Chicken Crispy in the Oven?
If your chicken skin isn’t getting crispy, try these tricks:
✅ Start with bone-in, skin-on chicken – Skinless chicken won’t crisp up.
✅ Use a roasting rack – Keeps airflow circulating around the chicken.
✅ Don’t cover the chicken during the final crisping stage – Trapping steam softens the skin.
✅ Broil for 2-3 minutes at the end for extra crunch.
6. How Do Restaurants Get Their Chicken So Crispy?
Professional chefs follow strict techniques to ensure the crispiest skin possible:
🔥 Air-dry the chicken overnight in the fridge for ultra-dry skin.
🔥 Sear the chicken in a cast-iron pan to develop a golden crust.
🔥 Use a high-heat oven (450°F+) or broiler finish for extra crunch.
🔥 Baste with butter during roasting for a flavorful, crispy glaze.
Conclusion – Mastering Crispy Braised Chicken
Would you like any modifications before I continue?
Conclusion – Mastering Crispy Braised Chicken in the Oven
Congratulations! You now have all the techniques and secrets to make perfectly braised chicken in the oven with crispy skin. By following this guide, you’ll create juicy, tender meat with a golden, crunchy exterior—just like a professional chef.
Key Takeaways for the Best Crispy Braised Chicken:
✅ Choose the right chicken cut – Bone-in, skin-on thighs work best.
✅ Dry the chicken thoroughly – Moisture prevents crispiness.
✅ Sear first, then braise – Locks in flavor while keeping the skin intact.
✅ Keep the skin above the braising liquid – Avoid soggy textures.
✅ Finish at high heat or under the broiler – Ensures extra crunch.
✅ Use the right herbs, vegetables, and sauces – Enhances flavor depth.
✅ Store and reheat properly – Keeps the crispy texture intact.
With this foolproof method, your crispy braised chicken will become a show-stopping dish for family dinners, special occasions, or meal prep.
Try It Yourself!
Now that you know the secrets, it’s time to put them into action! Follow this step-by-step recipe and let us know how it turns out.